How to Set Up Wireless Debugging on Android 11 to Send ADB Commands Without a USB Cable
- Get link
- X
- Other Apps

GADGET HACKS SHOP COMPARE PHONES ANDROID 11 FEATURES & CHANGES ANDROID 10 TIPS & TRICKS SAMSUNG ONE UI TIPS & TRICKS ONE UI 2 TIPS & TRICKS GALAXY S20 GALAXY NOTE 10 GALAXY S10 GOOGLE PIXEL ONEPLUS PRODUCTIVITY HACKS ANDROID DICTIONARY VIDEOGRAPHY TIPS TWEAKS & HACKS COLLECTION ROOTING & MODDING PRIVACY & SECURITY GAMING SOCIAL MEDIA TIPS MOBILE MOVIES & TV HEALTH & FITNESS SERIES ANDROID BASICS ROOTING GUIDES
HOW TOSet Up Wireless Debugging on Android 11 to Send ADB Commands Without a USB Cable
From booting into Fastboot mode with a single command to installing mods without root access, there's no shortage of reasons to use ADB. The catch, though, you had to be tied to a computer with a USB connection. However, a new feature in Android 11 finally allows you to run ADB commands over Wi-Fi instead of being tethered.
Step 1Download or Update SDK Platform-Tools
Since wireless debugging is new to Android 11, you need to make sure your Platform-Tools package is at least version 30.0.0, which brought initial support for the feature. Click the link below that corresponds with your operating system to download the latest version. You can save and extract the platform-tools folder to your desktop for easy access.

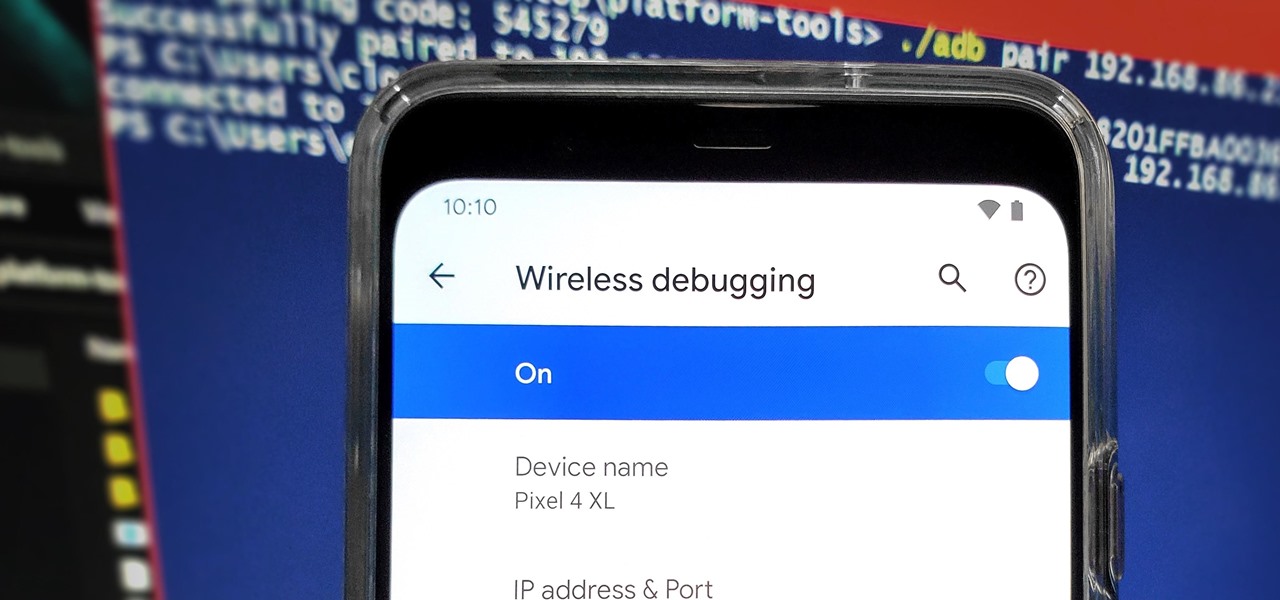
Step 2Enable Wireless Debugging
The procedure here will generally be the same for most devices. Pixel users need to go to "About Phone" in Settings and tap "Build Number" seven times to activate Developer Options. From there, head to Developer Options from Settings –> System –> Advanced or at the bottom of the Settings app. Tap the "Wireless debugging" option, check "Always allow on this network," then press "Allow."


Step 3Get Wi-Fi Device Pairing Code
From the main wireless debugging screen, tap "Pair device with pairing code," which will reveal what you'll need for connecting to your computer over Wi-Fi. The pairing code, IP address, and port number are all things required for use in the next steps, so leave the screen just like this and continue with the next part below.


Step 4Open a Command Window in Platform-Tools Folder
Back over to your computer, you need to open a command window from the platform-tools folder you downloaded from Step 1. This will allow you to run the few commands required to finish the setup via Wi-Fi so you can use ADB commands without a USB cable.
If you're a Windows user, you can open the platform-tools folder, then click the address bar at the top of the window. Type "cmd" without the quotes, then press enter to open the command window right away in your platform-tools folder.

If you're running Mac or Linux, you'll want to open the Terminal app, type in "cd" followed by a space, however, don't press enter just yet. From there, drag and drop the platform-tools folder onto the command window itself to get its location instantly entered for you. You could do this on Windows if you wanted to as well — there's more than one way to do the same thing.

Step 5Run the Wireless ADB Pairing Command
Take a look at your phone to find your device's IP address and what port it's currently using as well. Based on that information from Step 3, type the following command in the platform-tools command window, then press enter.
adb pair ipaddr:port
Note: Mac, Linux, and Windows PowerShell users might have to add a period and a slash ( ./ ) before entering certain commands. For example:
./adb pair 192.168.1.9:37179
Once you enter the above command that corresponds to your device's information, you'll be asked to enter the pairing code. Type in the device pairing code from Step 3 then press enter to confirm your action. If everything checks out, it should show "Successfully paired to" followed by the device's IP address and port number.

Step 6Run the Wireless ADB Debugging Command
From here, head to the main wireless debugging screen on your phone and check the numbers under the "IP address & Port" section. The port number will likely differ from the previous step, so you need to make sure you use the right one for this to work. Once you have the device info, type the following command in the platform-tools command window, then press enter.
adb connect ipaddr:port
Note: Mac, Linux, and Windows PowerShell users might have to add a period and a slash ( ./ ) before entering certain commands. For example:
./adb connect 192.168.1.9:40105
After you enter the above command, you should see "Connected to" followed by your device's IP address and port number. At this point, you're successfully connected via the Android 11 wireless debugging feature! You can now send any number of ADB commands over to your device without having to be connected by a USB cable. Happy modding!

Final Note
The IP address and port number for your device are local to your network, which means an outside source can't start sending you ADB commands. Unless they have access to the device and are on the same Wi-Fi network, the chances of someone else trying to hijack your session are slim to none. The port number changes every time you request a new pairing code, too, so that makes things even safer.
Want to help support Gadget Hacks and get a great deal on some sweet new tech? Check out all the deals on the new Gadget Hacks Shop.
Level Up Your Android Expertise
Weekly Android hacks — straight to your inbox.
- HOT
- LATEST
 HOW TOAll the New Features & Changes in Samsung's One UI 2 for Galaxy Devices
 HOW TOUndo Deleted Text with Your Samsung Galaxy's Keyboard
 HOW TOSee Passwords for Wi-Fi Networks You've Connected Your Android Device To
 HOW TOEnable the Built-in Screen Recorder on Android 10
 HOW TO7 Ways to Bypass Android's Secured Lock Screen
 HOW TOThe Complete Guide to Flashing Factory Images on Android Using Fastboot
 HOW TOUse Your Android as a Microphone for Your PC
 HOW TOType Faster with One Hand Thanks to This Hidden Gboard Feature
 HOW TOBlock Ads in All Your Android Apps Without Root or Extra Battery Drain
 HOW TOUse Your Android Device as a Second Monitor for Your Windows PC
 HOW TOUse Odin to Flash Samsung Galaxy Stock Firmware
 HOW TOTest Your Samsung Phone by Using Secret Code *#0*#
 VLC 101How to Stream Movies from Your Computer to Your Android Phone
 HOW TOForce-Enable Dark Mode for All Apps in Android 10
 HOW TOEnable or Disable Chat Heads in Facebook Messenger on Android for Quick Access to Conversations
 HOW TOForce Android 10's Gestures to Work with Any Custom Launcher
 HOW TOTurn Your Android Phone into a Universal Remote Control with These Cool Apps
 HOW TOFully Control Your Android Device from Any Computer
 HOW TODisable Read Receipts & Send Fake Camera Pictures on Kik Messenger
© 2019 WonderHowTo, Inc.
- Get link
- X
- Other Apps


Be the First to Comment